 Resume borders can add a nice touch to a basic resume template. In most cases, we don’t recommend adding a border to a resume that already has graphics, borders or lines. The focus should always be on the resumes content and you don’t have to add a border that will be too overwhelming.
Some of our resume templates already have borders around them but if you want to add a border to a resume template that has no border then the following instructions will help you do this.
This tutorial assumes that you are using Microsoft Word 2010 which is the program used to create the resume templates on this site.
[clear]How to add a border to your resume
- Go to the page layout tab.
- Click on page borders.
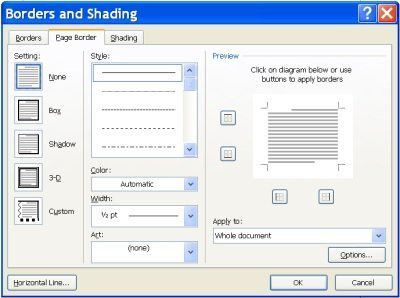
- Ensure that the border applies to the whole page (on the bottom right hand corner it reads “Apply to:”. Ensure that “Whole document” is selected).
- Choose the “setting” that you would like to use. You can either have a simple border (select box), a border with a shadow (select shadow), a 3-D border or a custom border. You can select each option to see how the border will look.
How to format your border
- Once you have added a border to your template you can then format it. You can change the style, color or width of the border.
- The style option enables you to choose a solid line or a dotted line. Scroll through the options to select a style. The solid line is probably the best choice for a resume.
- The color option enables you to choose the color of the border. For a resume the border will probably be black, grey or a shade of blue.
- The width option enables you to change the width of the border. You don’t want the border to be too overpowering so we don’t suggest that you select a very wide border.
- The art option enables you to choose icons that will form a border around your resume. Don’t even consider this option! This will not create a professional looking resume border.

